How to Upload Install and Configure TemplateToaster Generated Themes on Magento
Magento 1.9

How to Create Magento 1.9 Theme in TemplateToaster
How to Upload TemplateToaster generated Theme on Magento 1.9
Magento 2.0
How to Create Magento 2.0 Theme in TemplateToaster
How to Upload TemplateToaster generated Theme on Magento 2.0
Magento Theme installation guide for Magento 1.9
Magento Theme installation guide for Magento 2.0
- Copy theme files On XAMPP, WAMPP etc. (If you want to install Magento Theme on Local PC)
- Export the theme as .zip file.
- Extract the zip file to the Magento root folder.
- On Hosting Server (If you want to install Magento Theme on Hosting Server)
- Export the theme as folder.
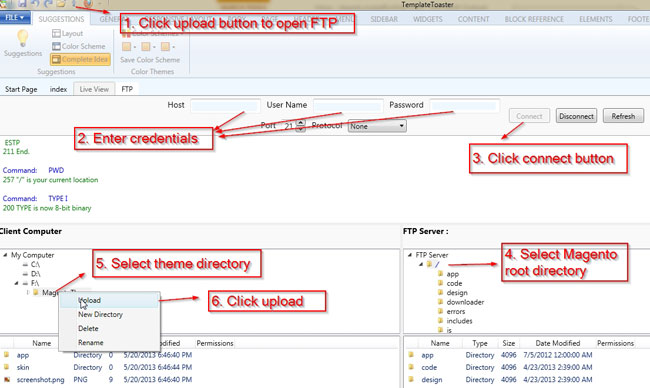
- Upload the content of the folder to the root of Magento directory. Please refer to the below screen shot.
2. Do Following:
- Open your Magento administration panel and go to System > Design Section.
- At the appeared screen click Add New theme button(or Add Design change button) in the top right corner.
- In the Custom design field select your newly installed theme
- Click Save button to apply changes
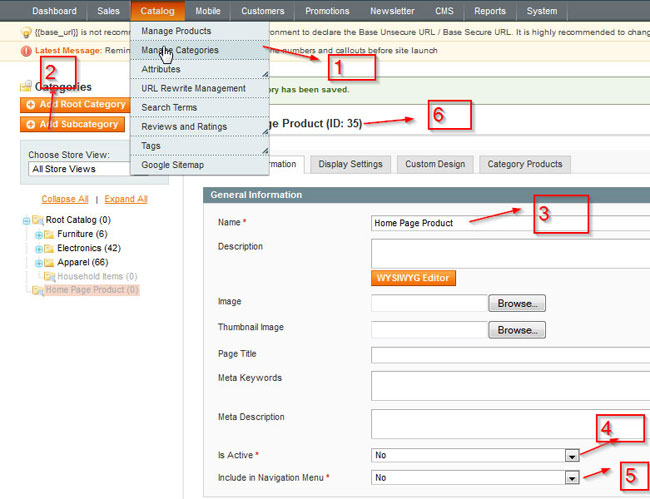
- Create a category as subcategory to your theme default category. This must be inactive to be hidden in the main navigation. This category will be for “Home page products”. Remember the ID of this category. See the image below.
- Once category is created it is good to add several products to it.
Edit home page
Go to CMS->Pages and Edit/Add home page. Go to Content and Add
{{block type="catalog/product_list" category_id="HomeProductsCategoryID" template="catalog/product/list.phtml"}}
Do not forget to replace “HomeProductsCategoryID” with the ID of one of the created categories
Add/Creating a Static Block (Optional)
- Log into your Magento store’s admin
- Navigate to CMS>Static Blocks
- Click Add New Block in the top right corner
- Give your block a Block Title
- Give your block an Identifier which will be used to call the block. Make sure the Identifier is all lowercase and separated by underscores to follow Magento’s nomenclature i.e. your_block_id
- Choose what store view the block belongs to. Just leave as All Store Views unless you have a good reason not to Set Status to Enabled
- Enter your HTML in the Content field.
- Click Save Block or Save and Continue Edit to save your settings.
Add block in xml (Optional)
<reference name="BlockReferenceName">
   <block type="cms/block" name"your_block_id" before="_">
	<action method="setBlockId">
	   <block_id>your_block_id </block_id>
	</action>
  </block>
<reference>
- Open the cms.xml from app > design > frontend > default > your_theme > layout folder.
- UnComment the above code. “BlockReferenceName” is the name of the area where static block has to be placed.
- This code will place the block “your_block_id” that you have created in the admin above the content on the category pages (notice the before=”-” attribute, which makes sure your block gets displayed before the rest of the content).
- To add more block paste above code and assign the appropriate “BlockReferenceName” and “your_block_id”.
Magento Theme installation guide for Magento 2.0
-
- After being done with the designing of a Magento 2 theme, to export the theme folder:Click on the Magento Icon at Top right of TemplateToaster(refer to Magento1.png) or go to File -> Export.
- A ‘Export Magento Theme’ named popup will open(refer to Magento1.png) -> Browse a path for saving the exported folder -> Select version 2.x -> click on Export Button in popup
Theme folder will be exported to the selected path.
- Find and open the Exported Magento theme folder -> Copy ‘app’ folder from the theme folder(refer to Magento2.png)
- Go to Magento 2 installation folder in your system -> Paste copied ‘app’ folder in it(refer to Magento3.png).
- Now, go to Magento 2 Dashboard -> Admin -> Store -> Configuration(refer to Magento4.png).
- In Configuration -> Go to General -> Design -> Design Theme -> Select the theme to be set as default from ‘Design Theme’ dropdown(refer to Magento5.png) -> Click on ‘Save Config’ button(refer to Magento6.png).
- ‘You saved the configuration’ message will appear, now your theme has been set as default(refer to Magento7.png).


